
Affiliate Disclosure
Some links on this page are affiliate links. As an Amazon Associate, we earn from qualifying purchases — at no extra cost to you. We do not buy, install, or physically handle the lights and decorations we cover; our rankings come from aggregated owner feedback and expert consensus, not first-hand testing. Commissions never change our verdicts. How we research · full disclosure.
Top 3 Picks
The safest way to learn how to hang Christmas lights on a roof is to work the roofline from the edge, not from the pitch. Shingle clips and gutter clips let you outline the whole roof from a ladder or an extension pole, so you get the classic street-facing glow without stepping onto the shingles. This guide covers the clips, the spacing, the power, and the safety that matters most up high.
Tools and materials
- Outdoor-rated Christmas lights measured to your roofline (C9 or mini)
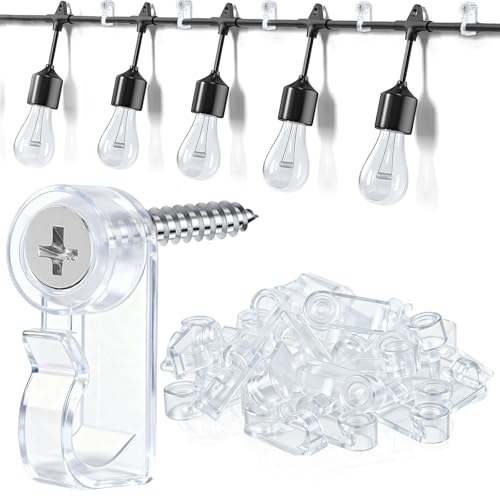
- Shingle clips and gutter clips, or all-in-one clips that do both
- A sturdy extension ladder and a spotter, or a light-hanging extension pole
- Outdoor extension cords and a GFCI-protected outlet
- An outdoor timer or smart plug
- A tape measure and non-slip footwear
How to hang Christmas lights on a roof, step by step
- Measure the roofline. Total every eave, ridge, and gable edge you want to light, add about 10% for slack and corners, and match it to the lit length on the box.
- Pick the clip for each edge. Use shingle clips on a bare roof edge and gutter clips on the gutter; all-in-one clips flip between the two where the roofline changes.
- Pre-clip on the ground. Attach clips to the strand at your spacing on the driveway, then carry the prepared run up — far faster than clipping one at a time at height.
- Test the lights first. Plug in every strand on the ground and confirm it works before it goes up.
- Clip along the edge from the ladder. Hook each clip under the shingle lip or over the gutter roughly every 12 inches, keeping all bulbs facing the same way.
- Reinforce corners and peaks. Add an extra clip at every corner, valley, and peak, where wind tension is highest and sag shows most.
- Run the cord and add a timer. Route the outdoor cord down to a GFCI outlet, connect strands within their limit, and finish with a timer.
- Power up and inspect. Light it at dusk from the street, then re-check after the first windy night and tighten any clip that shifted.
Choosing clips for a roofline: shingle clips, gutter clips and all-in-one clips
The roofline is rarely one continuous surface — it mixes bare shingle edge, gutter, and fascia. Shingle clips hook under the front edge of a shingle and hold the bulb at a consistent upward angle; gutter clips grip the gutter lip. All-in-one clips are the workhorse because a single clip flips to do either, so the line never breaks where the surface changes. Match the clip to your bulb size, since a clip cut for minis will not hold a fat C9. The best christmas light clips and best clips for gutters roundups compare clip types by bulb and edge.
C9 spacing, mini lights and the bulb-up roofline look
The classic roofline glow is C9 bulbs, evenly spaced, facing up and out toward the street. Space clips every 12 inches for a clean line, tightening to 6 to 8 inches for those larger C9 or C7 bulbs so they do not droop between clips. Pick one bulb orientation — up and out for the street-facing glow — and hold it the whole run, because inconsistent angle is what makes a roofline look amateur. The best christmas lights for roofline roundup covers which sets owners rate for this job.
Working safely from a ladder or extension pole, not the roof
Nearly all roofline work can be done from the edge, and that is the whole safety strategy: you almost never need to stand on the pitch. Set an extension ladder at the correct angle on firm, level ground with a spotter footing it, and move it along rather than leaning for the next clip — overreaching causes most holiday-light falls. On a single-story home, a light-hanging extension pole clips lights from the ground and skips the ladder entirely. For a tall, steep, or icy roof, hiring a professional is the right call.
Powering a roofline run: GFCI, LED strands and a timer
Run an outdoor-rated extension cord from a GFCI-protected outlet, keeping every connector up off wet ground. LED strands are strongly preferred on a roofline because they draw a fraction of the current of incandescent, so you can chain longer runs within the connect limit and cover more roof on fewer outlets. Never exceed the maximum strand count on the tag — for a long roofline, run separate strands back to different outlets. Finish with a timer so the display runs itself all season.
Common mistakes to avoid
- Walking the roof. Work from the edge. A wet or steep roof is a serious fall risk.
- Under-clipping corners and peaks. Wind loosens these first. Add an extra clip at every corner and peak.
- Mismatched clip and bulb size. A mini clip will not hold a C9. Match the clip to the bulb.
- Chaining past the connect limit. It overheats wire and blows fuses. Split long runs across outlets.
- No GFCI or timer. Roofline lights belong on a GFCI outlet, and a timer saves you climbing back up.
Related roofline guides
The roof, the gutter, and the fascia often get lit together. See how to hang lights on gutters and how to hang lights on a house for the full elevation, and installing permanent christmas lights for the mount-once alternative.
Our Picks